Friday, July 8, 2016

How To Weave A Baby Wrap


Do you love woven wraps? Have you seen the gorgeous handwoven baby wraps and fallen in love? Have you thought, "I wonder if I could weave myself a baby wrap?" You can! But there is quite a bit you have to learn first. Or, are you interested in handwovens but wonder why the are so expensive? Time, skill, and tons of work! Read on and it will make more sense.
I am a newer weaver. I am currently working on my 5th weaving project, my 3rd baby wrap. I am not a pro, but have learned a ton over the last year and wanted to share, hopefully helping someone else.
I've been Babywearing for 3 years and love snuggling my babies. I have also found a love for designing and creating woven fabric. There is something sweet about snuggling my baby in something I created for us.
So...here's how to weave a baby wrap.  Steps with pictures including rough time estimates. The steps will be general, I'm not teaching how to weave, just the process of weaving a baby wrap. I'll list some great resources for learning how to weave.

First off...what do you need?
-Weaving Loom- I bought a beautiful loom off Craigslist that came with yarn and all the accessories I could wish for. For a 4-shaft used loom common prices in my area range from $300 to $500. For more than 4-shafts, prices are from $1000 on up. In looking for a loom you want a floor loom that has at least a 32 inch weaving width (not the width of the loom, but the width of the area where you can weave). I've seen people ask about using Rigid Heddle looms, and from what I've read they aren't good for weaving wraps. A floor loom works well, just make sure it is wide enough.  It's also a good idea to try a loom out before buying it, looms aren't one size fits all, and it's important to make sure you are comfortable while using it.

-Weaving accessories-
     -Reed #10 or # 12 are commonly used for wraps, though other reeds can be used.
     -Heddles, you'll need to have enough heddles to make a wrap, depending on the number of ends per inch(epi) you use generally between 700 to 900 heddles.
     -Shuttle, a boat shuttle works great, though I'm sure you could use other kinds.
     -Reed hook/heddle threader.
     -Warping board or mill, some people make their own, or use other things for measuring yarn.
     -Bobbins and bobbin winder, some people use other things than a standard bobbin winder.
     -Packing- thick paper or sticks that are wider than your warp and will be packed in between the layers of warp on your back beam. I use old city plans (my husband is an engineer), other weavers use packing paper, or screens.

-Yarn- Common fibers used in wraps are: cotton, cottolin, Tencel®wool, silk, and hemp. There are many other varieties, but those are most common. Common cotton yarn weights for weaving wraps range from 5/2 to 16/2. The most common yarn used and what most people start with is 8/2 or 10/2 cotton for warp and weft. So what do those numbers mean...the first number is related to the weight of the yarn, and the second number is the number of plys/single strands twisted together (some countries have these numbers switched, though usually this is how they appear).  The lower the first number the heavier the strand of yarn, the higher the first number the lighter the strand of yarn.  Generally speaking, lower numbers will result in a thicker wrap, higher numbers in a thinner wrap, though some of this also depends on weave structure and other factors. If you are using older yarn for your warp make sure to check it first to be sure it won't easily break. Check it by holding a length in your hands and tugging in opposite directions. If it breaks really easily it probably won't be good for warp.
Places from which to buy yarn:
There are many different places to buy yarn.  Some that have been recommended are the following:


-Time!😀 Lots and lots of time.


Learn To Weave
-If weaving classes are available in your area, awesome, take them!

-If weaving classes aren't available in your area, there are great options on the Internet.
Craftsy has an awesome Floor Loom Weaving class that goes through the whole process of weaving.
It often goes on sale for $20. This craftsy class is how I learned to weave.  I really like how you can go back and watch it whenever you want and skip to the parts you need a refresher on.
Elizabeth Wagner also has a set of videos on YouTube that go through the weaving process.
Here's the link to her videos: https://www.youtube.com/c/elizziewag/videos

-Other awesome resources:
There are weaving Facebook groups that I love with so many kind weavers willing to answer questions and give help.
Warped Wrappers (Baby wrap weaver group)- https://www.facebook.com/groups/warpedwrappers/

Learning to Weave by Deborah Chandler is a book that many recommend for learning to weave.  Check your local library for it, or you can buy it online.


Step 1: Planning
-Design- Colors and Pattern.
Weaving structure- (the pattern) there are lots of drafts that work great for baby wraps. Easiest ones to start out with are plain weave, or a twill. There are lots of drafts to look at handweaving.net. There are also great books, I've used A Handweaver's Pattern Book by Marguerite Davison a lot. Different weaves bring about different wrapping qualities. Some are more textured, some more smooth, some more dense, others airier. Research to figure out what might work with your desired outcome. Drafts that work best for wraps are those that don't have super long floats. I try to not go over a length of 3 on my floats. Some weavers are fine with larger floats, but 3 is a good number around which to stay. Whether a certain size of float will work is also dependent on the weight of yarn you are using as well as structure.

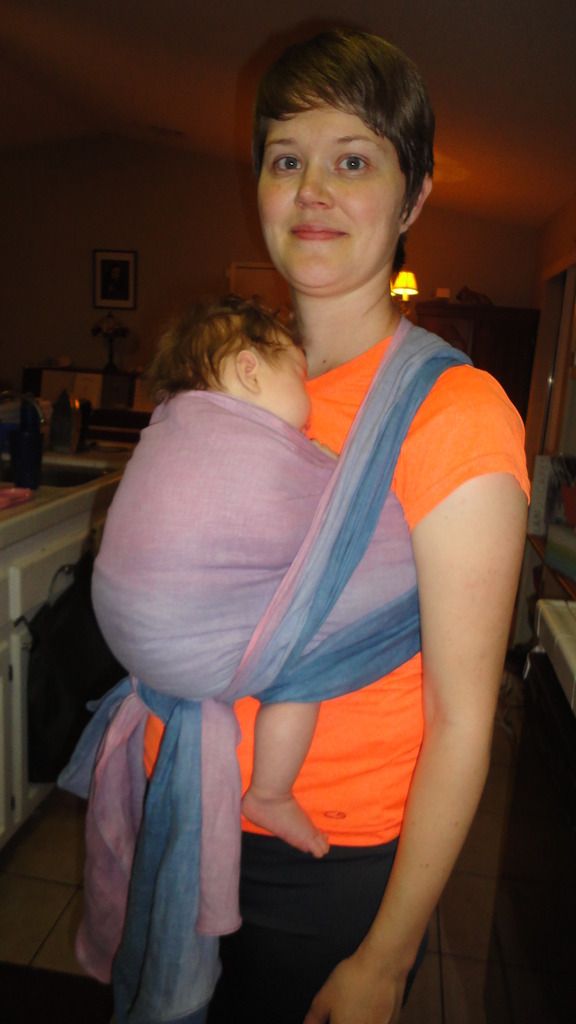
-There are many different things you can do with the color, which is the great part about weaving your own wrap, you can organize the colors however you want! Some babywearers like having the two edges different colors because it makes it easier to find the right rail (edge) when wrapping. It does help to do a wrapping of possible color mixtures to get an idea of how they might look together.  Here's my wrapping.


-Decide on sett, width and length- E-weaving has a great tool for finding a good starting point for sett (how many warp ends per inch) here http://e-weaving.com/Ashenhurst.html. Setts vary in wrap weaving depending on the yarn used, the weaving structure used, and the density you want. Some common setts for 8/2 cotton yarn are 20 epi for plain weave, and 24 epi for twill. The best thing to do is to find a good starting sett, then weave a sample piece to determine if that density is what you want, then adjust from there. Common width for a wrap in between 25 to 30 inches finished (so wider in the reed). The length for your wrap depends on what size wrap you want.  Add on extra length for sampling, and loom waste when calculating how long your warp will be, and how much yarn you will need. Make sure you have the right amount of yarn for your project. E-weaving has a great calculator for calculating the amount of yarn you will need: http://e-weaving.com/MoALive.html .
Here are some of my planning calculations:


-I chose to do the warp in 8/2 cotton in a 4 color grad yellow to pink to blue to peach. Mathematically I figured out what number of each color would make for an equal grad. The pattern I chose was Goose Eye from Davidson's book page 22. My warp ended up calculating to 31.5 inches in the reed with a 24 epi totaling 756 ends total.

Time I spent planning- a lot!!! I didn't track this time because I spent time planning while I did other things, like while doing the dishes, while nursing, etc.  Depending on what you want to do with your design, it can take a little to a lot of time.


Step 2: Winding your Warp
-Wind your warp- This is where you measure your yarn to all be the same length, then put it into chains to later be put onto your loom.  A good length for a starting single piece is about 5-6 yards.
I wanted to get a wrap, a ring sling and a baby blanket off of this warp so I wound my warp 10 yards long.

 
Time spent winding my 756 ends of 10 yard warp- 8 hours. Some weavers wind faster.  Some ways to wind faster are to wind more than one end (strand) at a time, or using a warping mill.

I dress my loom Back to Front, so if you dress yours Front to back the next couple of steps will be in a different order.

Step 3: Beaming
-Spread and beam your warp. This is where you lay out your yarn in order and spread it in the raddle then beam (wind) it onto the back beam of your loom. I used the Simple Tension Device found here: http://joyofweaving.com/articles/loom-hack-simple-tension-device to help me beam my warp.  It makes beaming much easier.  My husband also helped put the thick paper for packing in between the layers of warp, and turn the beam while I kept my chains going smoothly in front of the loom, which made things go faster.


Time spent winding on- 3 Hours

Step 4: Threading
-Threading the Heddles- This is where you thread each end of yarn through one heddle. Depending on your threading pattern this can be easy, or complicated, and the time will vary.


Time spent Threading- 4.5 hours

Step 5: Sleying the Reed
-This is where you pull a specific number of warp ends through each dent (opening slot) of your reed.  The number of ends you pull through each reed slot depends on your epi (ends per inch) and the reed number you are using.  I am using a #12 reed which means that there are 12 dents (openings) per inch on the reed.  My epi that I had dcided on was 24 epi, so I threaded 2 ends through each dent to get 24 epi. There is an awesome pdf in the 4-Shaft facebook group files called Reed Substituttion Chart that helps in figuring out how many ends to put through each dent.

Time spent sleying the reed- 3 hours

Step 6: Tying On
-This is where you attach your yarn to your front apron rod. There are a couple of different methods that can be used to tie on.  I just tied my bouts to the front apron rod.  After getting them all tied on you have to make sure that the tension is the same on all the ends.  For me this means a lot of tightening and checking and tightening, and checking.


Time spent tying on- 1.5 hours
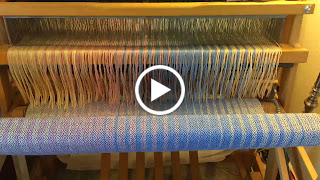
Step 7: Weaving
-This includes weft sampling, and structure sampling, then just weaving and weaving and weaving.  This also includes winding bobbins, advancing my warp, and fixing problems that arise.  My first piece was 4 meters long. 


Time spent weaving- 16 hours 
I wove at about 12 to 15 inches per hour.  When I surveyed a group of weavers about how fast they wove the answers ranged from 12 inches per hour to 36 inches per hour depending on weaving experience and how complicated their pattern was. 

Step 8: Finishing
-This includes cutting off, mending, stay stitching, wet finishing, hard pressing, and hemming. 
If you are looking to sell your wraps it is important that you know and follow the regulations for selling woven baby wraps.  Regulations currently apply to labeling and making sure you send a registration card along with the wrap.  More information about the regulations can be found online and in the Warped Wrappers files.


Time spent finishing- 4 hours

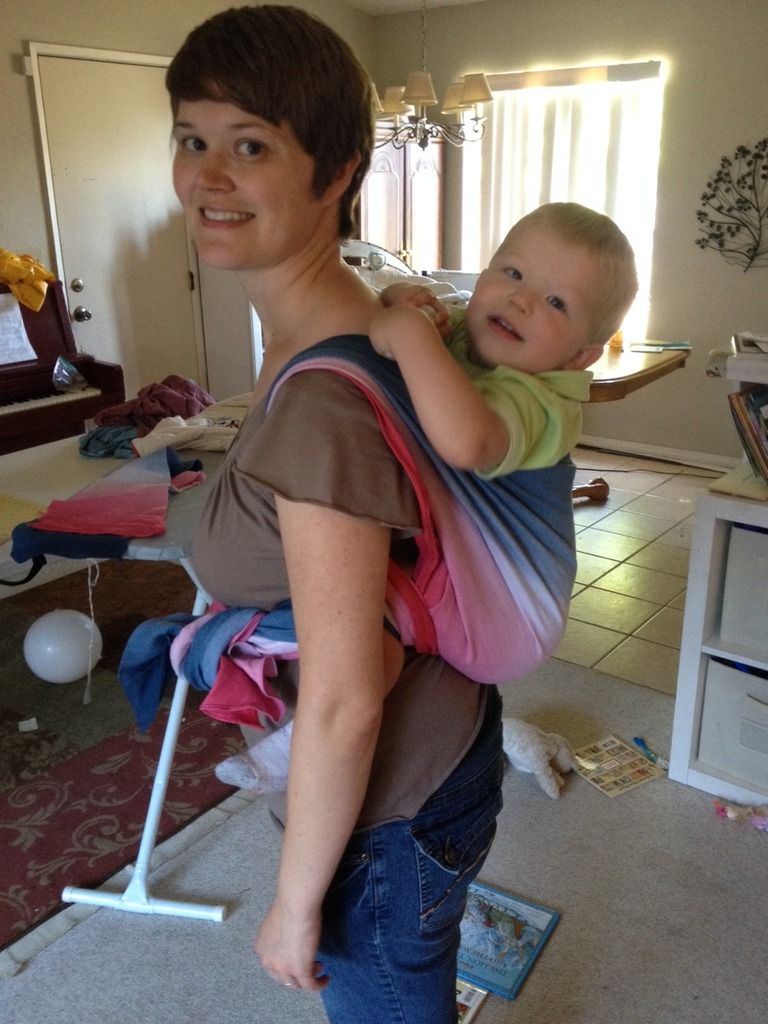
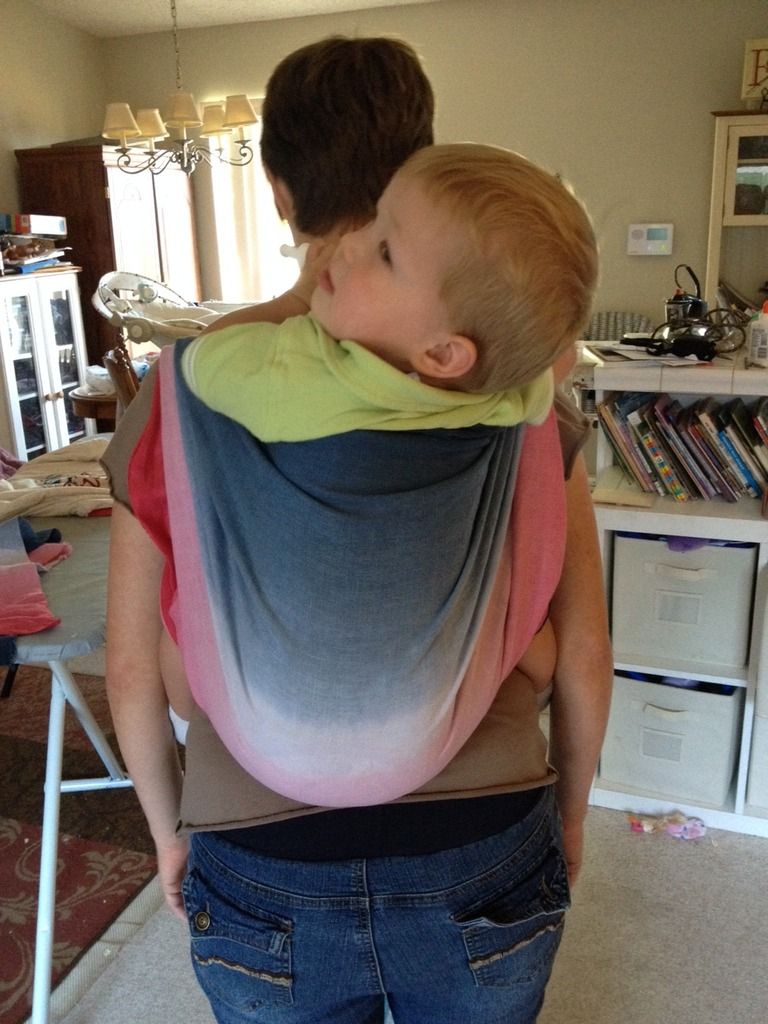
Hooray, now you can wear it!!!!!


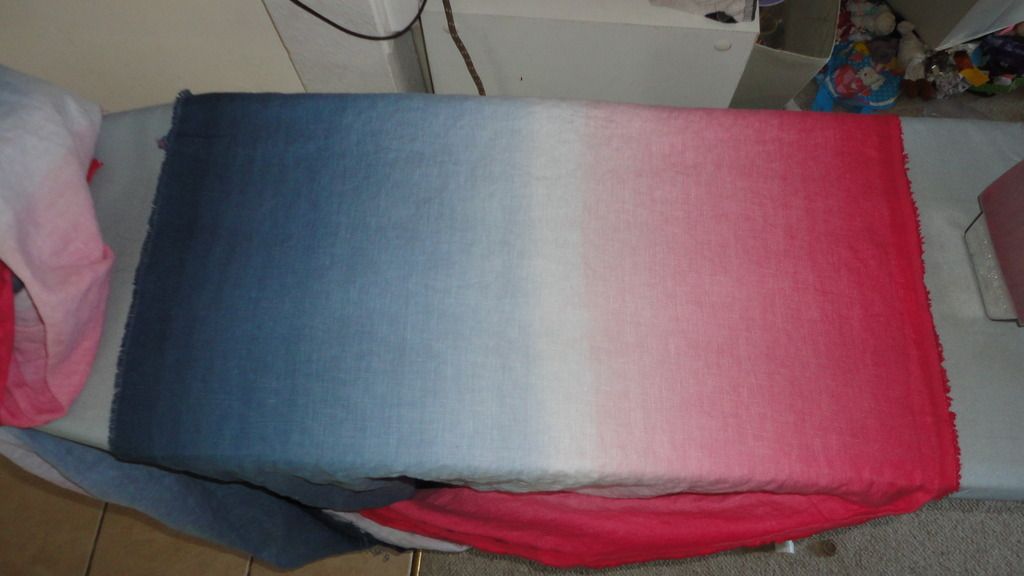
My wrap ended up about 4 yards (3.7 meters) long and 27 inches wide.  I love it!
Total time put into weaving this wrap- 40 hours plus design and planning time.
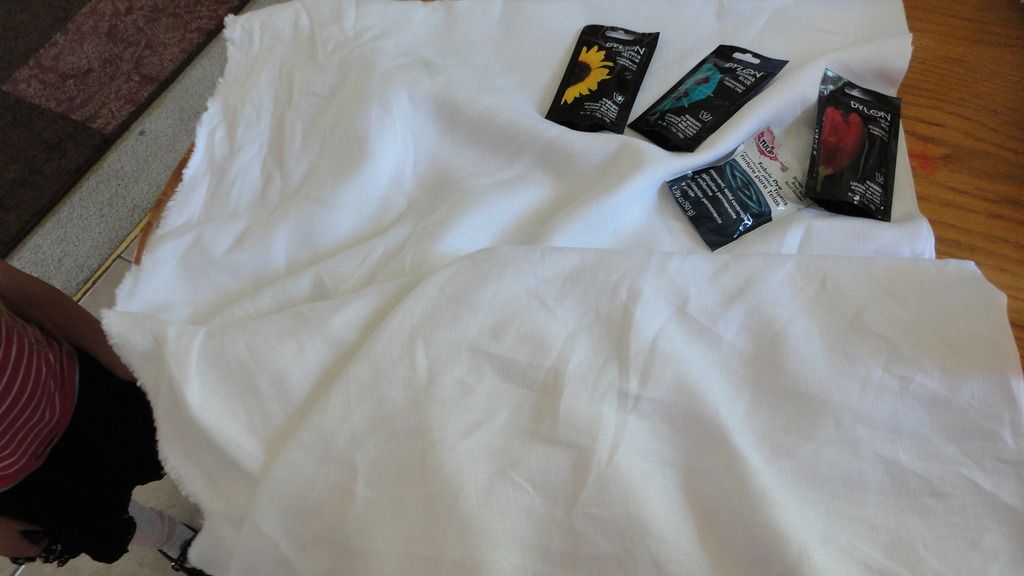
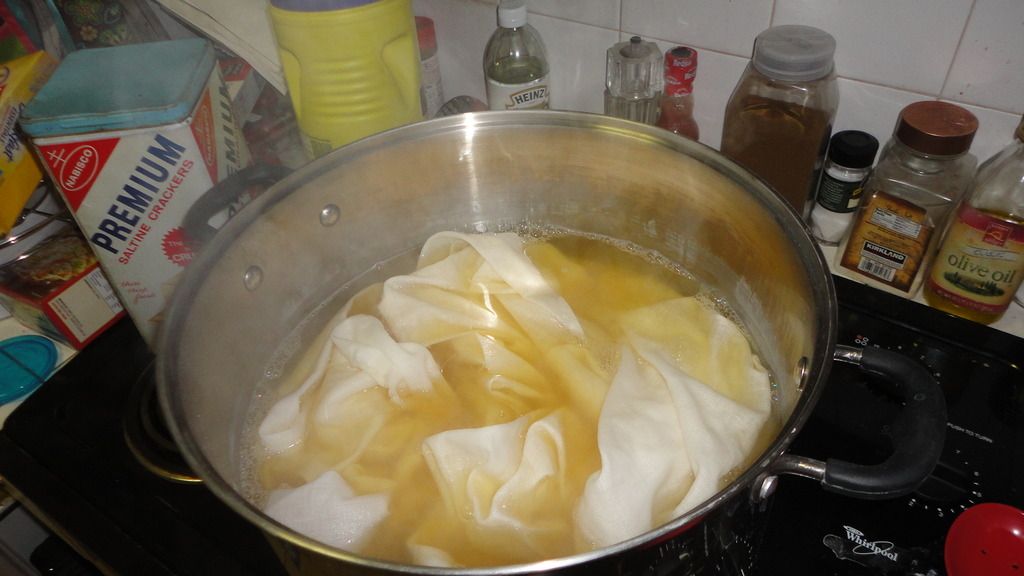
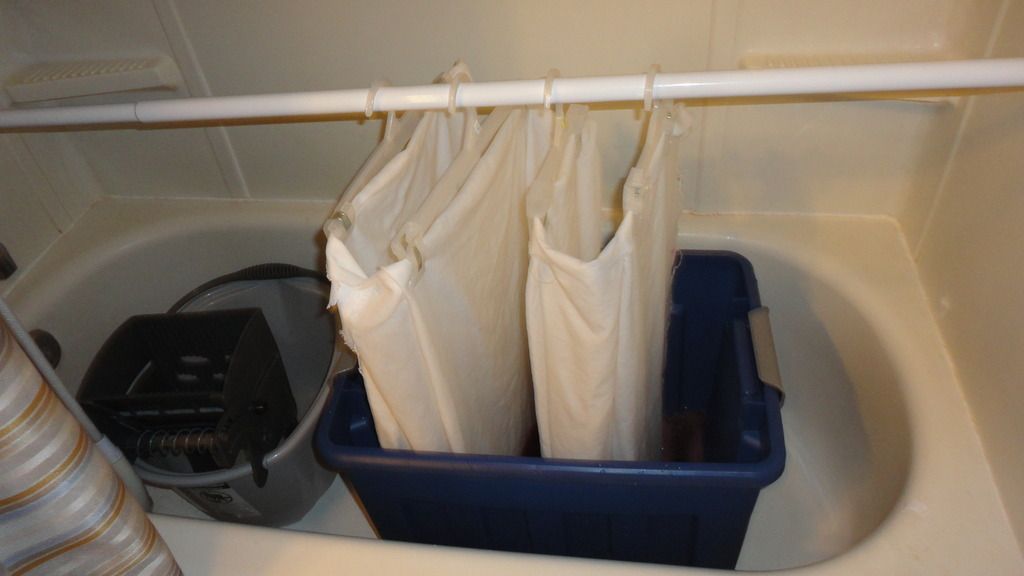
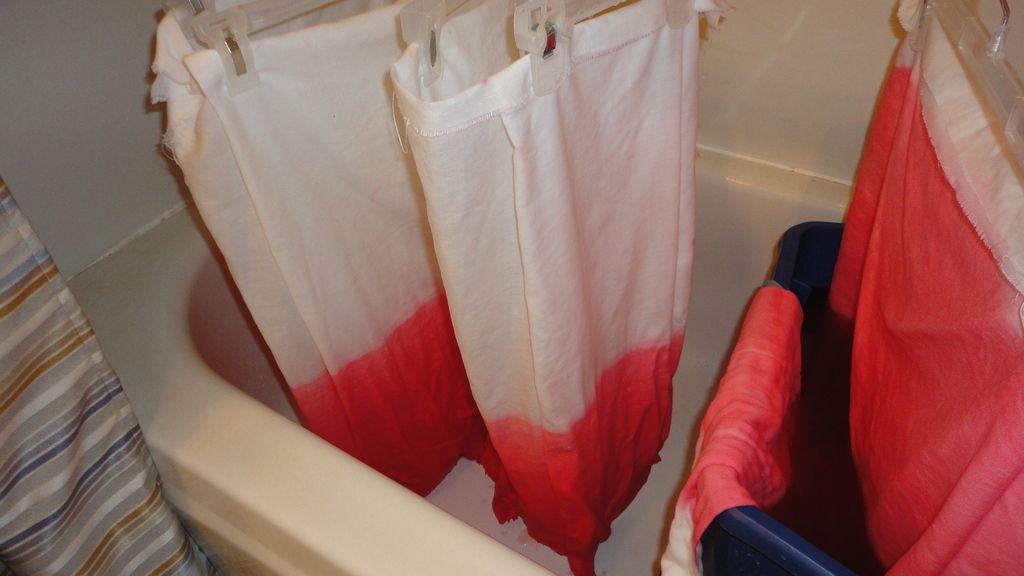
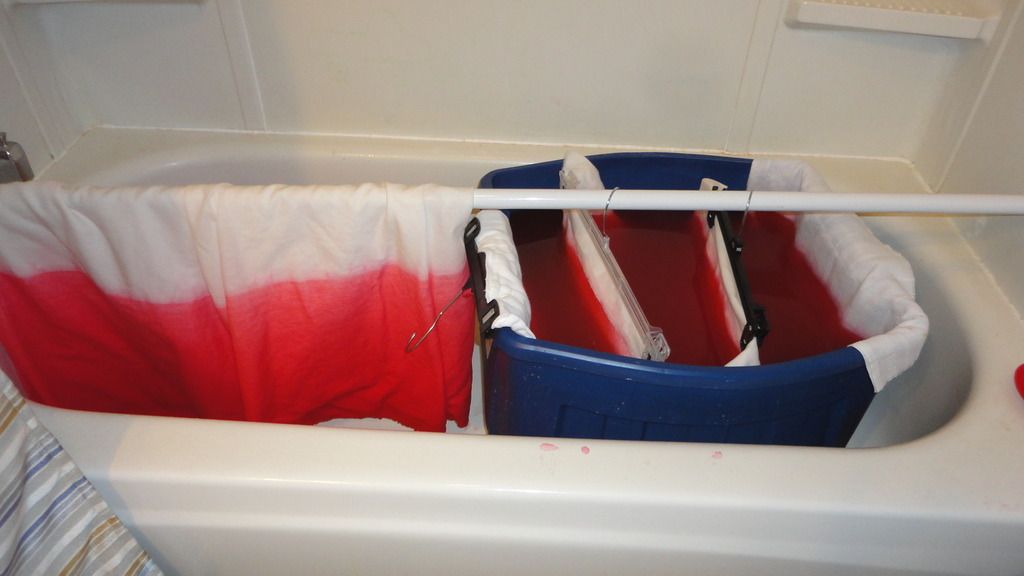
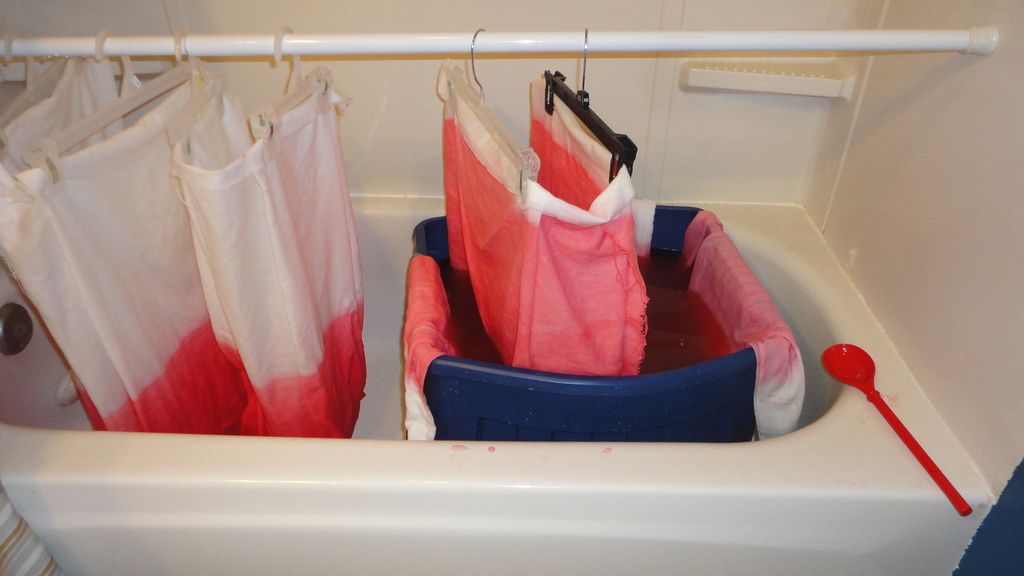
There was some extra time put in because I did a longer warp so it took me more time to wind and beam my warp, but if we just call it 40 hours, that means that I spent about 10 hours per yard of fabric. Of course weavers that have more experience than I do are more efficient and may not take as long.  But still, now you know why they cost so much, lots of time and work.  I also grad dyed all of my weft yarn, which is so much fun, but also takes a lot of time (I didn't include the dyeing time in my calculations).

I love weaving, and I love these beautiful baby wraps! I'm so grateful to have been led to weaving through babywearing.
I hope this information helps give a good overview of weaving a baby wrap.


Wednesday, July 15, 2015

DIY Sunset Grad Dye on a Woven Wrap Tutorial


I'm so excited about this Sunset/Rainbow Grad Dye! This is an Ellevill Zara Natural woven baby wrap, dyed using 3 colors to make this grad/ombre.  I looked at lots of pictures of Sunsets, and decided these were the colors I wanted, and am so happy with how they turned out!  Here's how I did it.

Here's what you need:
-Woven Wrap/Material, I used a woven wrap, if you are making your own woven wrap then you will need 3-6 yards of fabric (depending on how long you want it) washed and hemmed to between 26"-30" wide. Some good fabrics for making your own wrap are 100% linen, cotton/linen blend fabric, or osnaburg.  Natural fibers dye best!
-Fiber Reactive Dyes, I used Dharma dyes, other brands are Custom Colors, or you can also use Dylon or Tulip dyes, though you might need more dye to get vibrant colors
-Soda Ash or Washing Soda, both can be found at Walmart, Soda Ash in the pool section, and Washing Soda in the Laundry section. If you use Washing Soda, use 1/3 more (1 1/3 cup). I used Washing Soda.
-Salt non-iodized, about 12 cups or more, I bought a 25 lb. bag at Costco for like $4
-Hangers with clips, or clothespins, I used 10 hangers and the fabric was a single layer on each hanger
-Large Tote for dye bath, or you could probably use a big bucket, I've also used a trash can
-Gloves
-Blue Dawn
-Something to hang the wrap from, I used an old metal clothing rack that adjusted in height. I've also used a curtain tension rod (you have to be careful with tension rods that the rod doesn't fall and wreck your dye project), other people rig a pulley system
-Smaller container for mixing dyes


Prep Your Fabric:
-Wash and dry your fabric

-Scour you fabric- If you are using a woven wrap, you do not need to scour, and you can skip this step.  If you are making your own using fabric off the bolt like Osnaburg, you need to scour your fabric before dyeing it.  You do this by boiling water in a big pot, add 1 cup of soda ash and a little blue dawn and stir to dissolve. Add your fabric to the pot, and boil for 30 minutes or more.  If you are using Osnaburg, your water will probably turn a dark yellow.  When it is done scouring, rinse and dry your fabric. I didn't scour my fabric because it's a purpose woven wrap.

-Soda Ash Soak- Put enough warm water in your tote to cover your wrap, mix in 1 cup of soda ash, stir until dissolved.  Add your wrap to the water and stir/poke it to make sure that the wrap gets fully saturated.  Let soak for 30 minutes or more.  I let mine soak for a couple hours stirring every once and a while. You can save this water/soda ash to use later in your dye bath if you want.

-Wring out- When you are ready to dye your wrap, take it out of the soaking mixture and wring out the excess water, leave slightly damp.  I throw mine in the washer and do a Drain/Spin cycle.  Do not rinse it, you want the soda ash to stay in your wrap, it will help it dye better.

Setup:
-Hanging the wrap- Attach hangers to one rail of your wrap folding the wrap back and forth accordion style. With this wrap I only used one layer per hanger.  Some people attach multiple layers per hanger, but I didn't want the fabric to stick to itself and mess up my dyeing.


-Tapers- If you have tapers that hang down, you can loosely hand tack/sew them up, but make sure it's loose so the dye gets between the layers.

-Mixing your Dye Bath- I wanted to reuse my soda ash soaking water (which also saves on soda ash) so I left it in the tote and added more hot water so that the wrap would be able to move around easily in the dye bath.  Mix in your soda ash if you are using new water, or just add a little extra to the water you already have (probably optional to add more, but I wanted to just to make sure).  Add salt, I added 4 to 5 cups of Salt to my dye bath.  It should be about 1 cup per gallon of water. Stir to dissolve.  Put your powder dye in a separate container, I used about 1 Tablespoon of powder dye for each color that I did. Add warm/hot water to the powder dye and mix until dissolved.  Once it's dissolved, add it to your dye bath water mixture and stir well.  Once the dye mixes with the soda ash, it is most effective for about 45 minutes to and hour, so get dyeing. 

-Hang the wrap up over your dye tub.


Dyeing your Wrap:
1st Color- Yellow (I used Citrus Yellow)
-Slowly lower the bottom inch of your wrap into the dye bath and let it sit for a couple minutes. 

-Continue to gradually lower your wrap more and more into the dye bath until you reach the level at which you want the dye to stop.  


-I grad dyed 2/3 of my wrap yellow. My total dyeing time from when I put the bottom of my wrap in, to when I reached the level I wanted was about 45 minutes. (So I lowered it super slowly!). I also every once and a while kind of bobbed it up and down to try to help it blend smoothly and not end up with lines.


-When you have reached the level you want the dye to stop at, raise the wrap out of the dye.  I then let mine drip for a couple minutes, but I don't know that it's necessary.  Rinse with cold water until the water runs clear (or clear enough :)).  Wash on hot, and let dry.

(This picture doesn't show the grad very well, but it was there)

2nd Color- Dark Red (I used Jungle Red mixed with a little Teal Blue)
-Re-soak your wrap in a new soda ash water mixture, wring it out, and re-clip it to the hangers with non-dyed fabric at the top.

-Follow the same process as above, grad dyeing over the yellow up 1/2 of the wrap leaving a little yellow at the top. My total dyeing time was 40 minutes for this color.


-Rinse with cold water, then wash on hot and let dry.


3rd Color- Dark Blue (I used Cobalt Blue mixed with a little Teal Blue)
-Re-Soak your wrap in soda ash water, wring it out and attach the red part of the wrap to the hangers.  
-Follow the same procedure for dyeing as above, grad dye over the non-dyed part, and yellow up 1/2 of the wrap.  My total dyeing time for this color was 35 minutes.


 -Rinse with cold water until the water runs clear.

-Wash on hot with a tiny bit of Blue Dawn (blue dawn is optional, but helps get the extra dye out).  You may want to do a couple hot washes just to make sure all the extra dye is out.

-Let dry

 Admire your work, and enjoy wearing your baby in your beautiful wrap!


Tips:
-Before you start, practice using your dyes so you'll know what colors will look like when they mix on top of each other.
-Raising the fabric up and down a little in the dye can help make for a smooth grad.

 Here's another tutorial of 2 colors using Dylon and Tulip dyes and adding water to create the grad: http://peacefulcreativeliving.blogspot.com/2015/06/diy-grad-dye-woven-wrap-tutorial.html


Yeah, one more pic!


Wednesday, July 8, 2015

Chromecast

Hey ladies!

I am going to try to be better about our blog postings.

One thing I REALLLLYYYYY have been wanting to share with you is CHROMECAST!

Have you heard of it?

It is a little piece that looks almost like a flash drive that plugs into the HDMI of your tv.  You sync it up and you have access to lots of different things on your phone that can then be displayed on your tv such as Youtube, Hulu, Netflix, etc.  I manage my Chromecast from my Iphone 6 Plus. So easy!

I pretty much use it for Youtube because there are TONS of exercise channels with millions of videos and additions being added all the time.  It has made exercise soooo much more interesting.  And it's FREEEEEEE!

Some of my favorite channels are:
Zumba with Dovydas
BeFit
Gymra
Shine Dance Fitness

By far the two top ones for me are Zumba with Dovydas and Befit.

Dovydas is a young man who LOVES Zumba.  And you can tell in his videos! He is upbeat, does interesting steps and makes it fun.

BeFit features fitness videos from all types of people but I realized I really love Denise Austen! And she has a tons on there.  For some reason her voice is soothing to me.  Is that weird????

Chromecast retails for about $29.99-$34.99.  I got mine at Best Buy.  They do price match.  If they or another retailer such as Amazon has it cheaper they will match the price.  I would pay no more then $29.99.

HIGHLY RECOMMEND LADIES!


Monday, June 1, 2015

DIY Grad Dye Woven Wrap Tutorial

Craft time! Here's my first grad/ombré dye of a DIY woven wrap for babywearing.  I love love love how it came out!  It was a long process, but I feel that it paid off in the end with a pretty wrap.  
I made this wrap out of 100% linen suiting fabric that I bought at JoAnn Fabrics.  It's a nice weight and I think it will be great for summer.
Here's the process I went through for this dye job, hope you enjoy:

Here's what you need:
-Fabric (I used 100% linen, another popular choice is osnaburg, or a linen/cotton blend) the length depends on how long of a wrap you want.  I bought 4 1/4 yards of fabric.  The fabric was 53" wide, so I cut it down the middle length wise, and was able to get 2 wraps out of it. 4 1/4 yards ends up making about a size 4 wrap.
-Powdered dye- 2 packets of each color. I used Dylon, and Tulip, it needs to be fiber reactive so it will be safe for babies.
-Large pot that can hold all of the fabric (used for scouring and soaking the fabric)
-Rubber gloves to protect your hands
-Big tote for the dye tub
-Washing soda or soda ash (I used washing soda from wal-mart)
-Salt- a lot, I used about 10 pounds total, though how much you use is up to you
-1 Gallon container- a gallon jug would work, I used a gallon ice cream bucket, it made it easy for mixing everything in it.
-Blue Dawn dish soap
-Pant hangers with clips
-Tension rod
-Some big chunks of time (like 2-3 hours per color), lots of patience, and excitement! :)


Prep your fabric:
-Wash and dry your fabric (for shrinkage)

-Cut so that after hemming it will be between 25"-28" wide (or whatever width you want)

-Hemming...so you can hem it before you wash it, or before you dye it, or after you dye it.  Totally up to you.  Things to consider...if you hem it before you dye it the type of thread you use matters.  To have the thread dye, it has to be cotton thread.  Polyester thread won't dye.  If you wait to hem it until after, you could end up with some fraying.  I hemmed mine at the very end, and the linen didn't fray much at all, it was very easy to hem.  That way I was able to match my thread to my dyed fabric, and use polyester thread which is stronger.

-Scour your fabric- fill a large pot with water and 1 cup of washing soda and 1 tablespoon of Blue Dawn, bring to a boil.  Add you fabric, and boil for 30 minutes stirring occasionally. My water turned a dark yellow color (which totally made me wonder what was on that fabric, and glad I had scoured it to get the fabric clean) Rinse and wring out (I threw it in my washing machine and did a rinse and spin cycle).


-Soak- refill your pot with warm water and a cup of washing soda.  Add your fabric, and let it soak for 30 minutes. Drain the water, (I actually saved this water and used it later adding it in with my water to the dye bath, saved water and washing soda) do NOT rinse the fabric (you want the washing soda to stay in the fabric, it will help with the dyeing), wring out and leave the fabric damp.

Setup:
-Put your tote in the bathtub with the tension rod above it. The tension rod should be at the height where when the fabric is hung on it, and put into the tub, it hangs close to the bottom of the tote, but does not touch the bottom.
-Accordion fold your fabric and attach it to the hangers (you kind of have to mess with this and decide what works, but you want to spread the fabric out, so don't attach too much fabric to each hanger).

Dyeing the fabric:
-Add some warm/hot water to fill the bottom of the tote a couple inches, add 1/4 cup washing soda and 1 cup salt and mix.
-In a small container, mix dyes as directed on the packages, then add to the tote, and mix. (Try not to let it splash on the sides of the tote).
-Add a little bit of blue dawn (probably a tablespoon) to break the surface tension.
-Hang the fabric on the rod over the tote, so that the bottom of the fabric is in the dye (but not touching the bottom of the tote)

-Let the fabric sit for 5-10 minutes.
-While you wait fill up you gallon container with warm/hot water and mix in salt and washing soda (up to you how much, I used between 1/2 to 1 cup salt and 1 tablespoon washing soda for each gallon of water).
-After it has sat for 5-10 minutes, add the gallon water, salt, washing soda mixture (be careful not to let it splash on the fabric while you are adding it. I poured it down the corner wall of the tote)
-Set your timer for 5 minutes.
-Continue to add a gallon of warm water mixed with salt and washing soda every 5 minutes until you reach the middle (or the height you want to stop at).
-After adding the last water mixture, let it sit for 5 to 10 minutes, then take it out of the dye.
-Hang it to blanch for 30 minutes or more. (Which mean just let it hang for 30 minutes+)


-Rinse the fabric in cold water until the water runs clear.  This takes a long time, and lots of rinsing. If you will be doing another color on the other side, try not to rinse that side because you want to keep the washing soda in it.  Or just do another washing soda soak on that side before you dye it.

-Flip the fabric, and repeat the above dyeing steps on the other side of the wrap.

-When the wrap is done dyeing, and if fully rinsed, wash it on warm/hot and let it dry. (I washed it in my washing machine and dried it in my dryer.)

-Step back and checkout the amazing wrap dye you just did!!!
-Hem if you haven't done so, then take it for a spin with you little one.  

Extra Idea for left over fabric and dye:
So after I finished dyeing this wrap, I had a full tote of dye water just sitting there, so I decided to make use of it.  I took my extra fabric and did a grad dye, but in the revers order.  I submerged all of the wrap, then slowly pulled it out (moved the tension rod higher, not an easy feat) every 5-10 minutes.  I was not as dedicated to this one, so I wasn't very diligent with my time, so it's pretty chunky,but ended up with a fun grad dye anyways.


I also dyed some burp rags, and some fabric for a skirt for my daughter (might as well make good use of the dye when you have it.)

Update