Wednesday, July 15, 2015

DIY Sunset Grad Dye on a Woven Wrap Tutorial


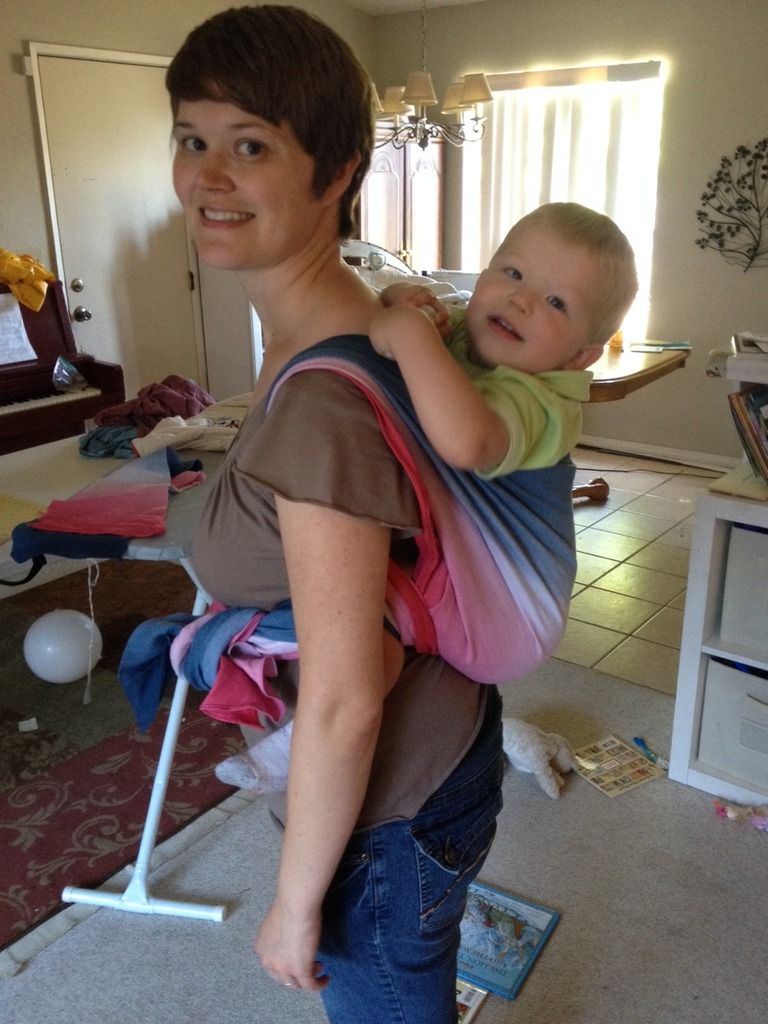
I'm so excited about this Sunset/Rainbow Grad Dye! This is an Ellevill Zara Natural woven baby wrap, dyed using 3 colors to make this grad/ombre.  I looked at lots of pictures of Sunsets, and decided these were the colors I wanted, and am so happy with how they turned out!  Here's how I did it.

Here's what you need:
-Woven Wrap/Material, I used a woven wrap, if you are making your own woven wrap then you will need 3-6 yards of fabric (depending on how long you want it) washed and hemmed to between 26"-30" wide. Some good fabrics for making your own wrap are 100% linen, cotton/linen blend fabric, or osnaburg.  Natural fibers dye best!
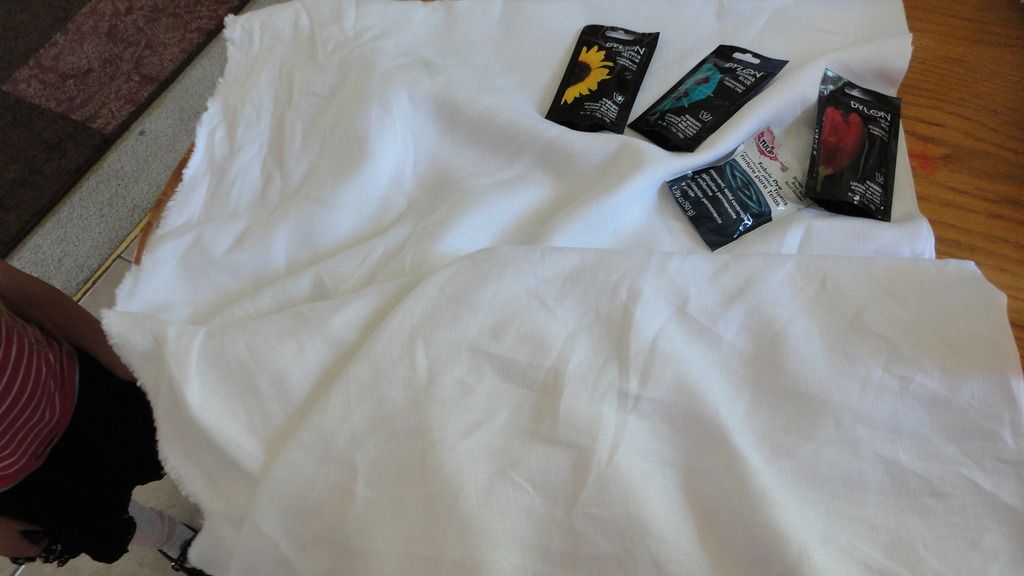
-Fiber Reactive Dyes, I used Dharma dyes, other brands are Custom Colors, or you can also use Dylon or Tulip dyes, though you might need more dye to get vibrant colors
-Soda Ash or Washing Soda, both can be found at Walmart, Soda Ash in the pool section, and Washing Soda in the Laundry section. If you use Washing Soda, use 1/3 more (1 1/3 cup). I used Washing Soda.
-Salt non-iodized, about 12 cups or more, I bought a 25 lb. bag at Costco for like $4
-Hangers with clips, or clothespins, I used 10 hangers and the fabric was a single layer on each hanger
-Large Tote for dye bath, or you could probably use a big bucket, I've also used a trash can
-Gloves
-Blue Dawn
-Something to hang the wrap from, I used an old metal clothing rack that adjusted in height. I've also used a curtain tension rod (you have to be careful with tension rods that the rod doesn't fall and wreck your dye project), other people rig a pulley system
-Smaller container for mixing dyes


Prep Your Fabric:
-Wash and dry your fabric

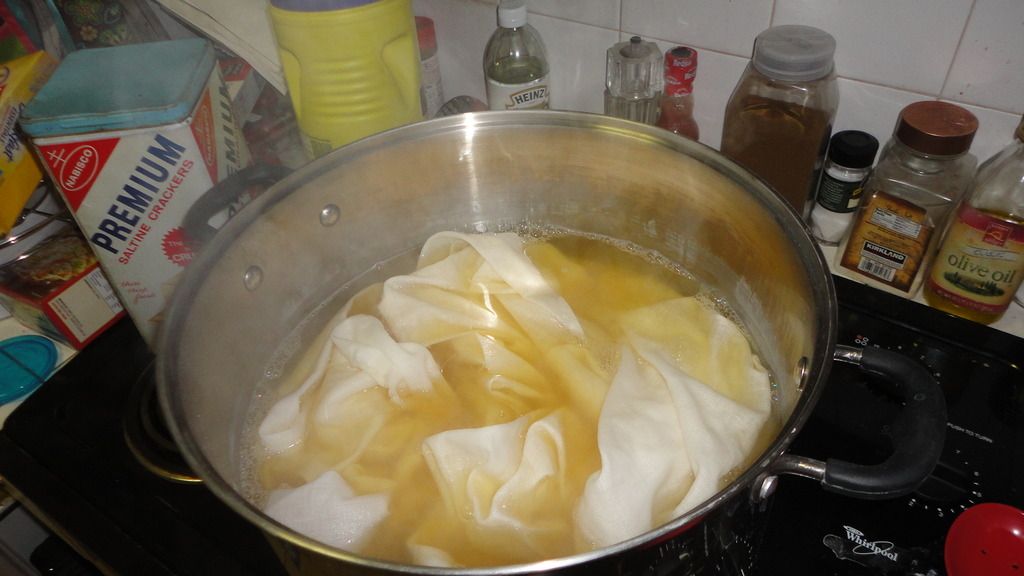
-Scour you fabric- If you are using a woven wrap, you do not need to scour, and you can skip this step.  If you are making your own using fabric off the bolt like Osnaburg, you need to scour your fabric before dyeing it.  You do this by boiling water in a big pot, add 1 cup of soda ash and a little blue dawn and stir to dissolve. Add your fabric to the pot, and boil for 30 minutes or more.  If you are using Osnaburg, your water will probably turn a dark yellow.  When it is done scouring, rinse and dry your fabric. I didn't scour my fabric because it's a purpose woven wrap.

-Soda Ash Soak- Put enough warm water in your tote to cover your wrap, mix in 1 cup of soda ash, stir until dissolved.  Add your wrap to the water and stir/poke it to make sure that the wrap gets fully saturated.  Let soak for 30 minutes or more.  I let mine soak for a couple hours stirring every once and a while. You can save this water/soda ash to use later in your dye bath if you want.

-Wring out- When you are ready to dye your wrap, take it out of the soaking mixture and wring out the excess water, leave slightly damp.  I throw mine in the washer and do a Drain/Spin cycle.  Do not rinse it, you want the soda ash to stay in your wrap, it will help it dye better.

Setup:
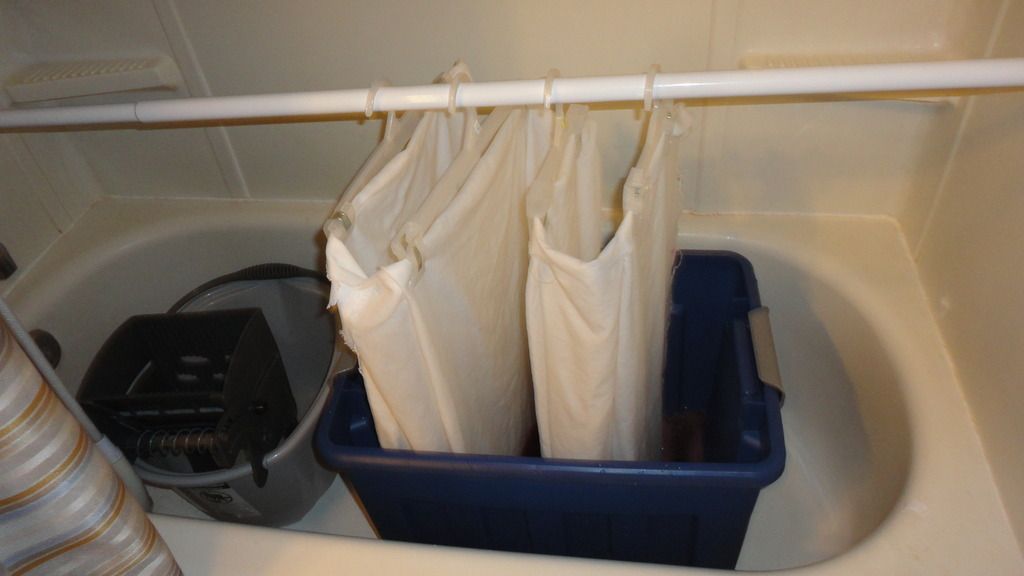
-Hanging the wrap- Attach hangers to one rail of your wrap folding the wrap back and forth accordion style. With this wrap I only used one layer per hanger.  Some people attach multiple layers per hanger, but I didn't want the fabric to stick to itself and mess up my dyeing.


-Tapers- If you have tapers that hang down, you can loosely hand tack/sew them up, but make sure it's loose so the dye gets between the layers.

-Mixing your Dye Bath- I wanted to reuse my soda ash soaking water (which also saves on soda ash) so I left it in the tote and added more hot water so that the wrap would be able to move around easily in the dye bath.  Mix in your soda ash if you are using new water, or just add a little extra to the water you already have (probably optional to add more, but I wanted to just to make sure).  Add salt, I added 4 to 5 cups of Salt to my dye bath.  It should be about 1 cup per gallon of water. Stir to dissolve.  Put your powder dye in a separate container, I used about 1 Tablespoon of powder dye for each color that I did. Add warm/hot water to the powder dye and mix until dissolved.  Once it's dissolved, add it to your dye bath water mixture and stir well.  Once the dye mixes with the soda ash, it is most effective for about 45 minutes to and hour, so get dyeing. 

-Hang the wrap up over your dye tub.


Dyeing your Wrap:
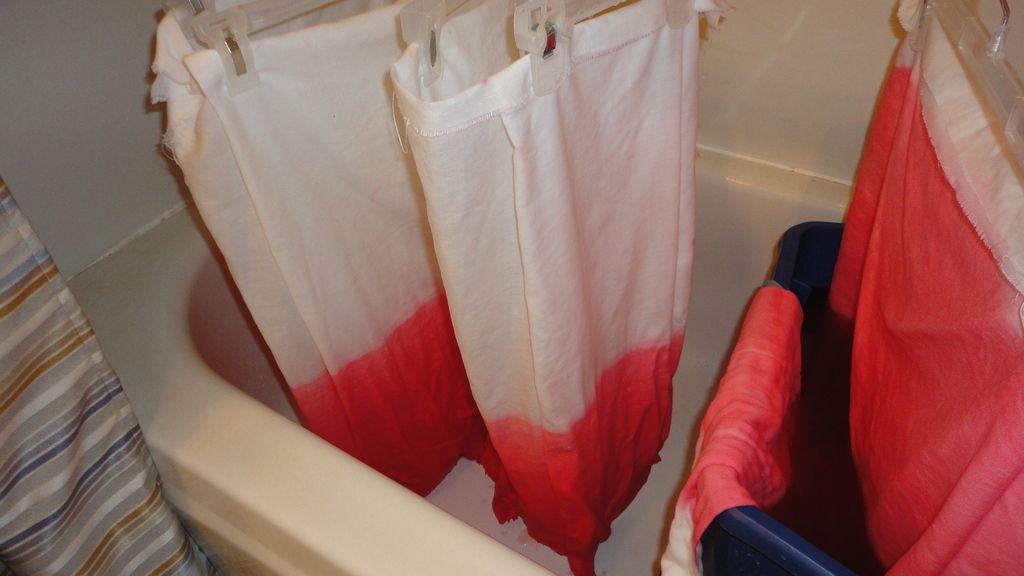
1st Color- Yellow (I used Citrus Yellow)
-Slowly lower the bottom inch of your wrap into the dye bath and let it sit for a couple minutes. 

-Continue to gradually lower your wrap more and more into the dye bath until you reach the level at which you want the dye to stop.  


-I grad dyed 2/3 of my wrap yellow. My total dyeing time from when I put the bottom of my wrap in, to when I reached the level I wanted was about 45 minutes. (So I lowered it super slowly!). I also every once and a while kind of bobbed it up and down to try to help it blend smoothly and not end up with lines.


-When you have reached the level you want the dye to stop at, raise the wrap out of the dye.  I then let mine drip for a couple minutes, but I don't know that it's necessary.  Rinse with cold water until the water runs clear (or clear enough :)).  Wash on hot, and let dry.

(This picture doesn't show the grad very well, but it was there)

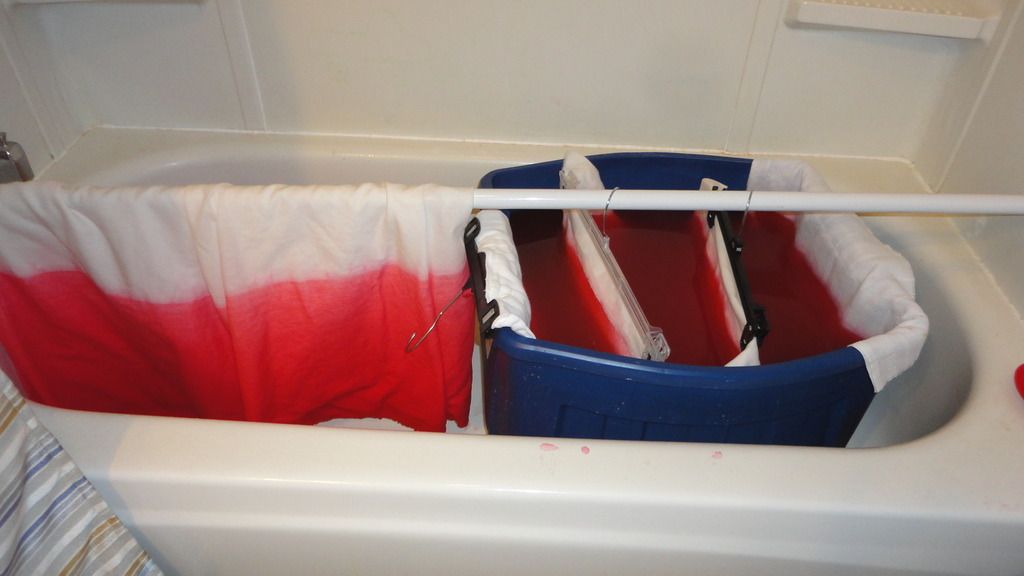
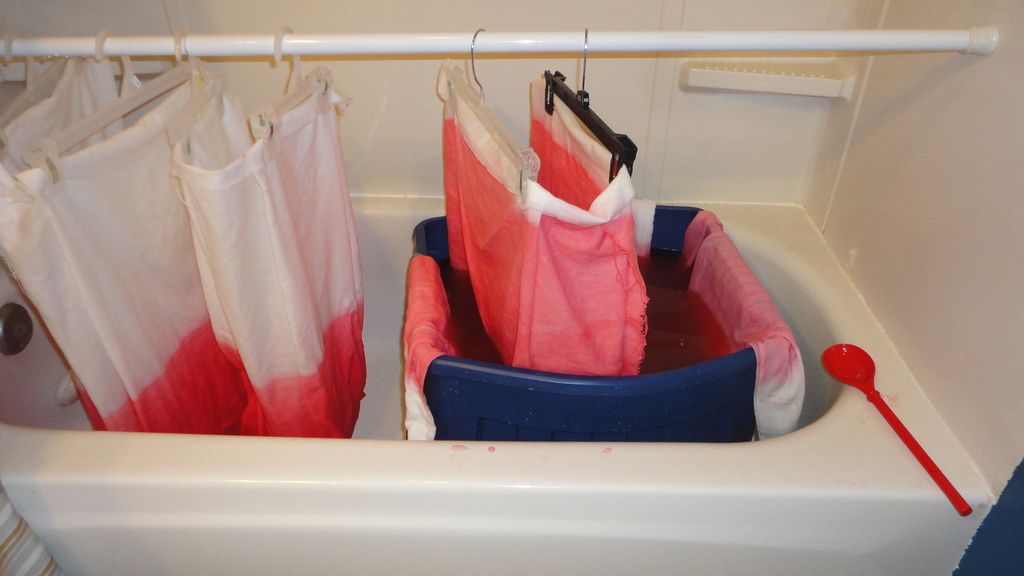
2nd Color- Dark Red (I used Jungle Red mixed with a little Teal Blue)
-Re-soak your wrap in a new soda ash water mixture, wring it out, and re-clip it to the hangers with non-dyed fabric at the top.

-Follow the same process as above, grad dyeing over the yellow up 1/2 of the wrap leaving a little yellow at the top. My total dyeing time was 40 minutes for this color.


-Rinse with cold water, then wash on hot and let dry.


3rd Color- Dark Blue (I used Cobalt Blue mixed with a little Teal Blue)
-Re-Soak your wrap in soda ash water, wring it out and attach the red part of the wrap to the hangers.  
-Follow the same procedure for dyeing as above, grad dye over the non-dyed part, and yellow up 1/2 of the wrap.  My total dyeing time for this color was 35 minutes.


 -Rinse with cold water until the water runs clear.

-Wash on hot with a tiny bit of Blue Dawn (blue dawn is optional, but helps get the extra dye out).  You may want to do a couple hot washes just to make sure all the extra dye is out.

-Let dry

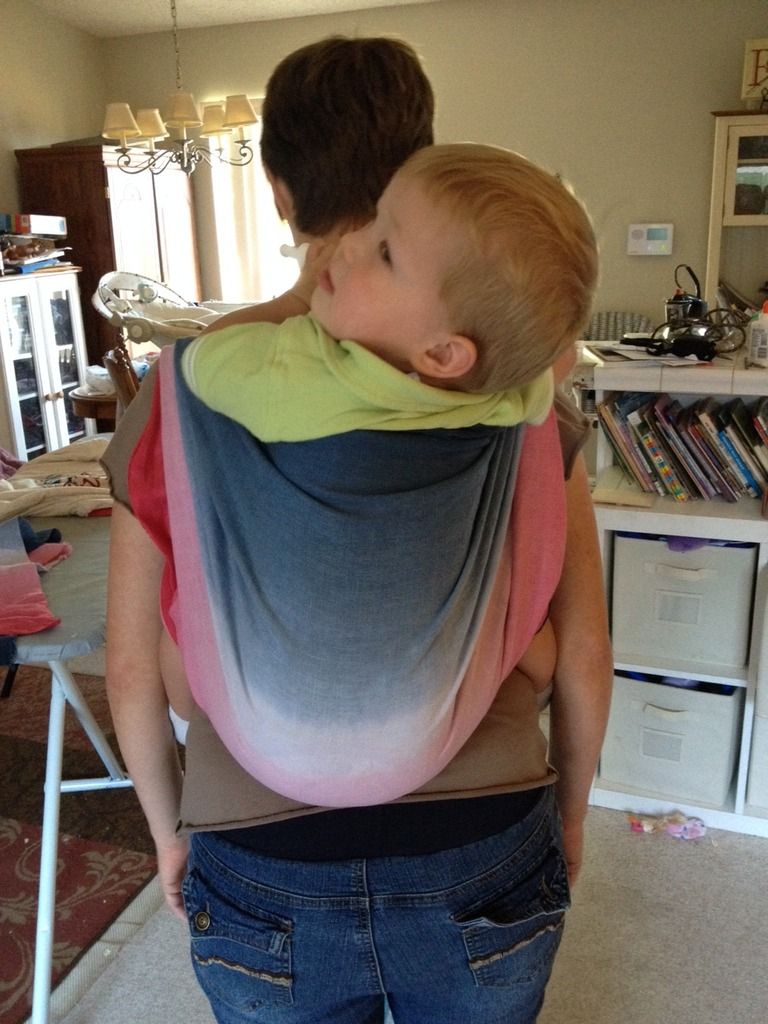
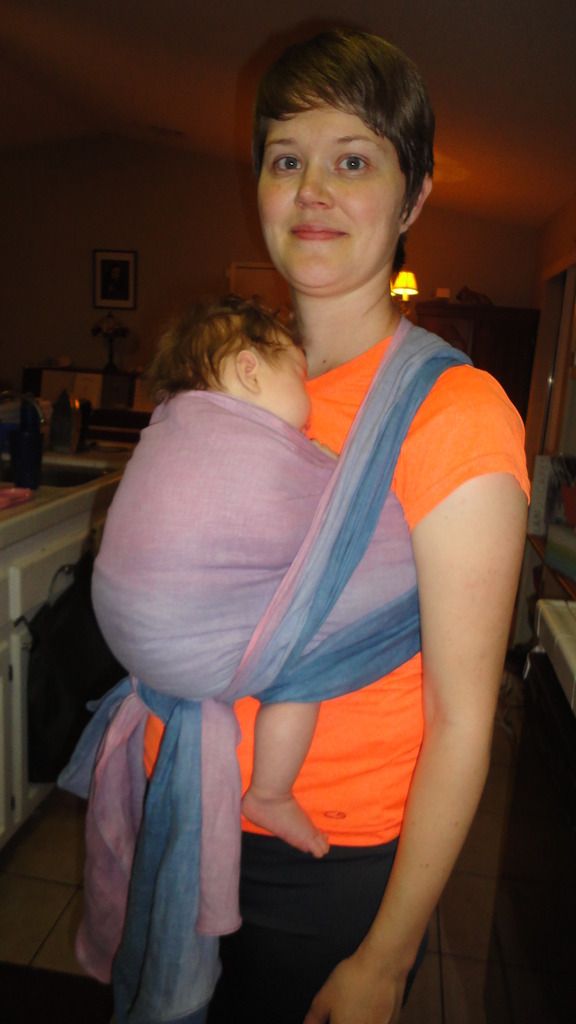
 Admire your work, and enjoy wearing your baby in your beautiful wrap!


Tips:
-Before you start, practice using your dyes so you'll know what colors will look like when they mix on top of each other.
-Raising the fabric up and down a little in the dye can help make for a smooth grad.

 Here's another tutorial of 2 colors using Dylon and Tulip dyes and adding water to create the grad: http://peacefulcreativeliving.blogspot.com/2015/06/diy-grad-dye-woven-wrap-tutorial.html
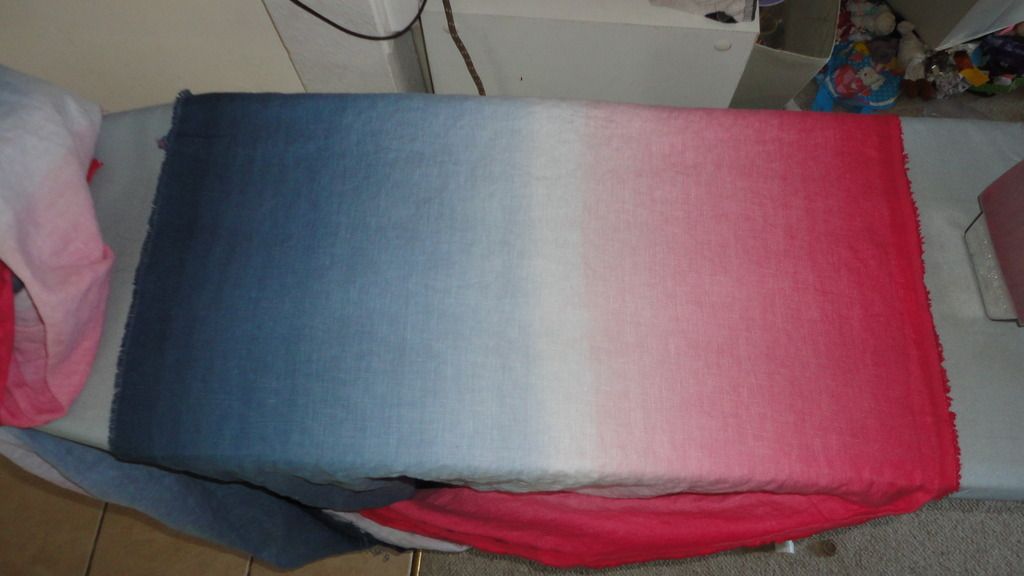


Yeah, one more pic!


Wednesday, July 8, 2015

Chromecast

Hey ladies!

I am going to try to be better about our blog postings.

One thing I REALLLLYYYYY have been wanting to share with you is CHROMECAST!

Have you heard of it?

It is a little piece that looks almost like a flash drive that plugs into the HDMI of your tv.  You sync it up and you have access to lots of different things on your phone that can then be displayed on your tv such as Youtube, Hulu, Netflix, etc.  I manage my Chromecast from my Iphone 6 Plus. So easy!

I pretty much use it for Youtube because there are TONS of exercise channels with millions of videos and additions being added all the time.  It has made exercise soooo much more interesting.  And it's FREEEEEEE!

Some of my favorite channels are:
Zumba with Dovydas
BeFit
Gymra
Shine Dance Fitness

By far the two top ones for me are Zumba with Dovydas and Befit.

Dovydas is a young man who LOVES Zumba.  And you can tell in his videos! He is upbeat, does interesting steps and makes it fun.

BeFit features fitness videos from all types of people but I realized I really love Denise Austen! And she has a tons on there.  For some reason her voice is soothing to me.  Is that weird????

Chromecast retails for about $29.99-$34.99.  I got mine at Best Buy.  They do price match.  If they or another retailer such as Amazon has it cheaper they will match the price.  I would pay no more then $29.99.

HIGHLY RECOMMEND LADIES!


Monday, June 1, 2015

DIY Grad Dye Woven Wrap Tutorial

Craft time! Here's my first grad/ombré dye of a DIY woven wrap for babywearing.  I love love love how it came out!  It was a long process, but I feel that it paid off in the end with a pretty wrap.  
I made this wrap out of 100% linen suiting fabric that I bought at JoAnn Fabrics.  It's a nice weight and I think it will be great for summer.
Here's the process I went through for this dye job, hope you enjoy:

Here's what you need:
-Fabric (I used 100% linen, another popular choice is osnaburg, or a linen/cotton blend) the length depends on how long of a wrap you want.  I bought 4 1/4 yards of fabric.  The fabric was 53" wide, so I cut it down the middle length wise, and was able to get 2 wraps out of it. 4 1/4 yards ends up making about a size 4 wrap.
-Powdered dye- 2 packets of each color. I used Dylon, and Tulip, it needs to be fiber reactive so it will be safe for babies.
-Large pot that can hold all of the fabric (used for scouring and soaking the fabric)
-Rubber gloves to protect your hands
-Big tote for the dye tub
-Washing soda or soda ash (I used washing soda from wal-mart)
-Salt- a lot, I used about 10 pounds total, though how much you use is up to you
-1 Gallon container- a gallon jug would work, I used a gallon ice cream bucket, it made it easy for mixing everything in it.
-Blue Dawn dish soap
-Pant hangers with clips
-Tension rod
-Some big chunks of time (like 2-3 hours per color), lots of patience, and excitement! :)


Prep your fabric:
-Wash and dry your fabric (for shrinkage)

-Cut so that after hemming it will be between 25"-28" wide (or whatever width you want)

-Hemming...so you can hem it before you wash it, or before you dye it, or after you dye it.  Totally up to you.  Things to consider...if you hem it before you dye it the type of thread you use matters.  To have the thread dye, it has to be cotton thread.  Polyester thread won't dye.  If you wait to hem it until after, you could end up with some fraying.  I hemmed mine at the very end, and the linen didn't fray much at all, it was very easy to hem.  That way I was able to match my thread to my dyed fabric, and use polyester thread which is stronger.

-Scour your fabric- fill a large pot with water and 1 cup of washing soda and 1 tablespoon of Blue Dawn, bring to a boil.  Add you fabric, and boil for 30 minutes stirring occasionally. My water turned a dark yellow color (which totally made me wonder what was on that fabric, and glad I had scoured it to get the fabric clean) Rinse and wring out (I threw it in my washing machine and did a rinse and spin cycle).


-Soak- refill your pot with warm water and a cup of washing soda.  Add your fabric, and let it soak for 30 minutes. Drain the water, (I actually saved this water and used it later adding it in with my water to the dye bath, saved water and washing soda) do NOT rinse the fabric (you want the washing soda to stay in the fabric, it will help with the dyeing), wring out and leave the fabric damp.

Setup:
-Put your tote in the bathtub with the tension rod above it. The tension rod should be at the height where when the fabric is hung on it, and put into the tub, it hangs close to the bottom of the tote, but does not touch the bottom.
-Accordion fold your fabric and attach it to the hangers (you kind of have to mess with this and decide what works, but you want to spread the fabric out, so don't attach too much fabric to each hanger).

Dyeing the fabric:
-Add some warm/hot water to fill the bottom of the tote a couple inches, add 1/4 cup washing soda and 1 cup salt and mix.
-In a small container, mix dyes as directed on the packages, then add to the tote, and mix. (Try not to let it splash on the sides of the tote).
-Add a little bit of blue dawn (probably a tablespoon) to break the surface tension.
-Hang the fabric on the rod over the tote, so that the bottom of the fabric is in the dye (but not touching the bottom of the tote)

-Let the fabric sit for 5-10 minutes.
-While you wait fill up you gallon container with warm/hot water and mix in salt and washing soda (up to you how much, I used between 1/2 to 1 cup salt and 1 tablespoon washing soda for each gallon of water).
-After it has sat for 5-10 minutes, add the gallon water, salt, washing soda mixture (be careful not to let it splash on the fabric while you are adding it. I poured it down the corner wall of the tote)
-Set your timer for 5 minutes.
-Continue to add a gallon of warm water mixed with salt and washing soda every 5 minutes until you reach the middle (or the height you want to stop at).
-After adding the last water mixture, let it sit for 5 to 10 minutes, then take it out of the dye.
-Hang it to blanch for 30 minutes or more. (Which mean just let it hang for 30 minutes+)


-Rinse the fabric in cold water until the water runs clear.  This takes a long time, and lots of rinsing. If you will be doing another color on the other side, try not to rinse that side because you want to keep the washing soda in it.  Or just do another washing soda soak on that side before you dye it.

-Flip the fabric, and repeat the above dyeing steps on the other side of the wrap.

-When the wrap is done dyeing, and if fully rinsed, wash it on warm/hot and let it dry. (I washed it in my washing machine and dried it in my dryer.)

-Step back and checkout the amazing wrap dye you just did!!!
-Hem if you haven't done so, then take it for a spin with you little one.  

Extra Idea for left over fabric and dye:
So after I finished dyeing this wrap, I had a full tote of dye water just sitting there, so I decided to make use of it.  I took my extra fabric and did a grad dye, but in the revers order.  I submerged all of the wrap, then slowly pulled it out (moved the tension rod higher, not an easy feat) every 5-10 minutes.  I was not as dedicated to this one, so I wasn't very diligent with my time, so it's pretty chunky,but ended up with a fun grad dye anyways.


I also dyed some burp rags, and some fabric for a skirt for my daughter (might as well make good use of the dye when you have it.)

Update


Friday, May 29, 2015

Baked Oatmeal


Yum! A couple of weeks ago Kim told me about baked oatmeal, thank you Kim!  It sounded yummy, so I started trying different recipes.  I finally found a recipe I kind of liked, then changed it to my liking.  I now made this recipe a couple times.  I make a full recipe with makes about 9 servings, then I eat it throughout the week.  The original recipe had a full stick of butter, so I substituted half of it with applesauce, and love the substitution.

Ingredients:
-3 cups oats
-1 cup packed brown sugar (you could probably reduce this some, especially with adding the applesauce)
-1 1/2 teaspoons baking powder (the original recipe called for 2 tsp., but that was a little much for me, so now I use 1 to 1 1/2 teaspoons)
-1 teaspoon salt
-1 teaspoon ground cinnamon
-2 eggs
-1 1/2 cups milk
-1/4 cup butter, melted (half a stick)
-1/4 cup to 1 cup applesauce (this last time I used a cup, and it was delicious, though I think next time I would decrease the brown sugar with adding that much applesauce)
-Walnuts (optional) (I love walnuts in this)

Preheat oven to 350 degrees. Ina large bowl combine oats, brown sugar, baking powder, salt and cinnamon. In another bowl whisk eggs, milk, melted butter and applesauce.  Stir into oat mixture until well blended. Mix in walnuts.
Pour into a greased 9 in. square baking pan. Bake 40-45 minutes or until set. Serve warm with milk.  

DIY Woven Baby Wrap Grad Dye

Craft time! This last weekend I tried something new, and am so happy with how it turned out.  As most of you know, I'm way into baby wearing, and own a fair amount of wraps and baby carriers.  With summer coming I decided I wanted a 100% linen wrap because it should be cooler for the hot summer days.  100% linen wraps are pretty expensive, so I decided to try my hand at making and dyeing my own wrap.
I bought 100% linen suiting from JoAnns (thank you mom for the Christmas gift card), and Dylon dyes which are fiber reactive so they aren't harmful to babies (can you tell I did tons of research leading up to actually doing this project?).  I originally wanted a grad/ombre dye that went from yellow to turquoise, so I bought those colors.  Then I decided that I wanted it to be more of an orange to a darker turquoise.  So I bought a red to mix with the yellow (apparently regardless of what is taught in kindergarten, red and yellow do not make orange :)), and dark teal to go with the turquoise (again, didn't turn out how I thought that color combination would).  Obviously it didn't come out the colors I was planning, but luckily it came out these fantastic colors.  I love it!
The dyeing process took a super long time, but was worth it.  The grad came out pretty smooth.  Then I hemmed it, and it's ready to use.  I used it yesterday with each kid, and it was pretty comfortable.  It has a lot of breaking in to do, but I can tell that it will be cool, and is going to be such a great wrap for this summer!

Monday, May 25, 2015

Affordable Beauty Products


Happy Memorial Day ladies!

Today I wanted to talk about some of my favorite and affordable beauty products.

Some of these are a little bit more expensive than others but still within a reasonable price range and in my opinion, totally worth it.

The first product I want to talk about is the Paul Mitchell Thicken Up Styling Liquid.  This is probably about $18.  It is a gel-like consistency that you put in your wet or damp hair.  For me it only works if I add it in wet or damp hair and then blow dry it when it's damp.  If you let this dry in your hair it doesn't work.  At least for me it doesn't.  Good stuff!

The next product is the Garnier Fructis De-Constructed Texture Tease.  I get this at my local Wal-Mart for about $4.  LOVE.  THIS.  STUFF.  I was getting so tired of curling my hair and then spraying hairspray in it because it was super stiff and just made my hair feel gross.  The way I use this is to curl my hair, let it cool and then spritz this throughout.  It gives it flexible hold while giving some texture and messiness.  This would also be great to spritz in hair before wearing your hair up to also give some hold and texture and something for bobby pins to latch on to.

The next is the Simple Micellar Cleansing Water.  This is about $6 at my local Wal-Mart.  I will definitely be using this product for years to come.  It is hard to explain what this actually is but I basically use this just at night right after I've washed my face and it makes my skin feel really fresh, clean and hydrated.  I apply a good amount with a round cotton pad.

The next product is the Maybelline Master Glaze in Just Pinched Pink.  LOOOOOOOOVVVVVEEE.  It is a cheek glaze that gives off the most beautiful, natural glow.  I am not kidding.  I do a swipe on each cheek and stipple/buff with the Elf Stipling Brush which is only $3 at Target or Wal-Mart.  You ALL have to go buy this.  It's amazing.  No joke.  Amazing.  Like, what are you doing still reading this???  Go get it now!

The next product is the Loreal Infallible Makeup Setting Spray.  This is a must for anybody who wears any makeup at all.  The reason is because you can do a whole drug store face but when you spray a few things of this on it will last you MUCH longer.  Urban Decay makes an All Nighter Makeup Setting Spray that I hear is extremely comparable to this.  The Urban Decay one is about $30 and this one is about $15 at Wal-Mart of Target.  A little pricier but I'm telling you it's worth it.  I have a huge problem with makeup lasting.  This has helped tremendously.

The next product is the ELF Baked Blush in Peachy Cheeky.  This is EXACTY like some blushes that MAC sells.  Except I believe the MAC version is about $25 and this is $3.  It is the most beautiful peach/pink color with a highlighter built in.  Not all ELF products are good but this is exceptional.  Let me say it again, EXCEPTIONAL.

The last product is the Maybelline The Nudes pallet.  I really like this! It is about $9 at Wal-Mart or Target and has the most beautiful shades of browns, neutrals, etc.  I would find this comparable to the Urban Decay Naked pallets.  But for a fifth of the price.


Saturday, May 23, 2015

"When Calls the Heart"

Hello again!

Sorry for so many posts in a row!

I just had to tell you about a new tv show I discovered on the Hallmark channel.  It's called "When Calls the Heart".  It is based off of a novel.  It is FABULOUS.  It is a story of a young lady named Elizabeth Thatcher who ventures to a Western town in Canada named "Coal Valley" to be a teacher.  She comes from a rich family and finds living in such a rural place to be hard.  She meets Jack who is a Canadian Mounty (spelling?).  He disdains Elizabeth because he was sent there by her rich Father to watch after her.  The town also has had a recent disaster as more then a dozen men have died in a mining accident.

It is full of love triangles, action, heart wrenching plot lines and mystery.  It is all done in very good taste and I would recommend it to somebody probably 13 years or older.  Just because even though it is done in very good taste it does have some action scenes and intense plot lines.

I don't think it is available online.  I would try to find it though if you can.  I know for sure it is available through Netflix though. 

 I haven't discovered a show in years that is both really fun to watch AND in good taste.  HIGHLY recommend ladies! "When Calls the Heart" is truly a gem in this day and age of horrible tv.

Let me know if you start watching it!

Snack Ideas

Hello!

Happy Memorial Day Weekend!

I thought I would do a little post about some snacks I have been loving lately.

Sorry there are no pictures!

Snack #1) Gogurt - I have rediscovered my love of Gogurt! I used to eat it all the time and then didn't buy it for years.  Costco had an AMAZING deal on a huge box of Gogurts so we got some.  BEST.  DECISION.  EVER.

Snack #2) Laughing Cow Cheese with Wheat Thins - Mom and I talked about the Laughing Cow Cheeses today and how great they are.  Maybe they aren't the most nutritional thing in the world but a wedge of that and some Wheat Thins are a tasty snack.  I recently discovered the Pepperjack version and I love it!

Snack #3) 1/2 an avocado with 1/4 c. cottage cheese - This was a stretch for me.  I can only eat cottage cheese when I'm at a salad bar, never on it's own.  But I took the leap! I just used half an avocado scooped out of it's skin and spooned 1/4 c. cottage cheese into it.  I like that the avocado acts as a little bowl for the cottage cheese.  I then sprinkled some salt and pepper on top.  I had this today as a snack and was SUPER full after.  It is an amazing snack because it's a good balance of healthy fats and protein and so in turn fills you up for a long time.  The taste was just a little off for me so next time I am going to take 2 Wheat Thins and crumble them on top for a different taste and something crunchy.  

I hope this gives some ideas for good snacks! 

Today I am making homemade granola bars with oats, peanut butter, coconut oil (my new favorite thing) and honey.  I am going to press some chocolate chips in the top of them too.  If it turns out I will for sure post it!

I also found a great recipe for protein pancakes.  It is from Shelley on House of Smiths.  They have cottage cheese in them and then you blend them in the blender.  Lots of fun new things to try!

Let me know what recipes or snacks you've been using!

Wednesday, May 20, 2015

Black Bean Mango Quesadillas

Recipe adapted from Our Best Bites

I love anything mango.  Mango treats, mango chapstick, mango scents.  It is just good stuff!

I got the most recent Our Best Bites book that features recipes that are 400 calories or less and when I came across this recipe I knew I had to try it.  It had everything I love in it.  Black beans, mango and pepper jack cheese.

Recipe calls for one mango but I used two and it was barely enough.  So highly recommend two.  

I used one of those large plug-in skillets and that was super handy because I could heat up three to four at a time. 

I did not serve with sour cream or avocado like it said you could.  It was great without it.  But I'm sure it would also be great with it.

I didn't over stuff the quesadillas and the recipe only yielded four servings.  Four quesadillas is perfect for Ken and I but keep in mind for those of you with big families that you will have to double or triple the recipe.

It is delicious.  I LOVE the freshness of the mango with the creaminess of the cheese and the sturdy balance of the beans.  HIGHLY recommend this recipe.

I would even consider making things WAY easier on yourself and making the mango salsa and beans in the morning and then storing them in the fridge till dinner.  When it's time to eat I would add a little water or chicken stock to the beans and then heat them back up so that you don't risk having cold beans in your quesadillas.  Dinner would literally take 3 minutes to make if you did this.  I am actually going to do this next time.  And then if you have leftovers how great would it be to have everything in the fridge all ready for a fabulous lunch the next day!

This would be great served with some chips and guacamole or some cilantro lime rice.

Recipe is in link below the picture.  Just roll over the "Our Best Bites" title and click.  I couldn't get it to highlight for some reason! But it is there!

Nutritional Info:
Calories-236 (NICE)
Carbs-33g
Sugars-4g
Fat-7.3g
Fiber-6 (NICE)
Protein-10g (NICE)

Sunday, May 17, 2015

"Smooth seas do not make skillful sailors."


This is an African proverb that was used in this months CES Fireside by Elder Lynn G. Robbins. It really stuck out to me.  Often when we are going through hard times/a learning experience, I think we would prefer that things were easier.  Yet when we think about the people that we want to be someday, (Christ-like, empathetic, strong testimony, patient, forgiving..."skilled spiritual/life sailors) we often obtain these qualities through learning experiences/hard times.  I'm grateful that our loving Heavenly Father understands us and what will help us to become the "skillful sailors" we need to be to be strong in the Gospel, and endure to the end.

Saturday, May 16, 2015

Sweet and Spicy Slow Cooker Pineapple Salsa Chicken

Last night I made this recipe I had pinned on my pinterest.  It was super delicious!!!  Stephen and I both loved it!  Stephen did think that next time I should use less sugar, I thought it was find, but next time I probably will try to use just a half a cup instead of a full cup.  We ate it over rice, and I added cheese and sour cream to mine.  Stephen didn't think it needed it, which is obviously the healthier option.  Looking through the ingredients, it seems like a pretty healthy recipe, and it's very yummy.  I'm already looking forward to leftovers.  I used frozen chicken in mine, and cooked on high for 4 hours and it came out great.  I ended up using KC Masterpiece wing sauce because I couldn't find Frank's, so I'm not sure what kind of difference it would make.

http://www.carlsbadcravings.com/sweet-spicy-pineapple-salsa-chicken-slow-cooker/

Friday, May 15, 2015

Paleo Cookies


I called Mom tonight to tell her about these cookies I made.  She had already looked at the picture and said they didn't look good.  Which they don't! But surprise, surprise, they ARE!

Now are these as good as decadent, butter laden, oil added, sugary chocolate chip cookies? Heck no.  Heccccckkkkk no.  BUT, they do hit the spot and do taste like a legit cookie and are SOOO much better for you nutrition wise.

These cookies have coconut oil in them.  Have you ever used coconut oil before? I hadn't either! Coconut oil has many health benefits such as helping thyroid function, boosting metabolism, improving heart health, is an anti-inflammatory, etc.  It really is a super food IF you buy the right kind of coconut oil.

When you you go to the grocery store you will notice many different types of coconut oils.  I have done the research for you so you know what to buy!

You want to buy USDA organic unrefined coconut oil.  The "USDA" organic part ensures it was grown without pesticides and the unrefined part means it's in a pure form.  The other thing you want to look for is either centrifuge extracted, cold pressed or expellar pressed.  You most likely will find USDA organic unrefined expellar pressed at your grocery store.  Whether it says virgin or extra virgin has no influence on the health aspect of it and does not matter.

The other odd ingredient in this recipe is almond flour.  SOOO much healthier than all purpose flour.  It is literally blanched almonds that have been ground up into flour.  It IS expensive but worth it in my book.  The healthy fats in this flour are amazing. 

Okay, so now that we've got some information out of the way let's get down to the recipe!

Paleo Cookies
Makes 11 cookies

1 1/4 c. almond flour
1/4 t. salt
1/4 t. baking soda
1/4 c. coconut oil (do not melt)
1/4 c. honey
1 t. vanilla
3 T. chocolate chips plus 11 more to dot on top of each one

Preheat oven to 350 degrees.  In a bowl combine flour, salt and baking soda.  Mix.  In a separate bowl mix together coconut oil, honey and vanilla.  You do not want to microwave the coconut oil.  To really mix it in well I smashed it a bunch with a fork to incorporate everything together and make it as smooth as I could.  Combine the wet and dry mixtures and mix well.  Add in the 3 T. chocolate chips.  Line 2 baking sheets with parchment paper and scoop out cookies.  Place one chocolate chip on top of each one (I did this because the mixture is hard to mix so I wanted to ensure every cookie got chocolate).  My cookies were very chocolate-y so you could get away with 2 T. chocolate chips and then dotting each one with a chip.  Bake 7-8 minutes.  It is fine if the edges get brown.  They didn't taste burnt.  Make sure to really let these set up before eating.  They are much better that way.  Enjoy!

For a decadent treat you could do a small scoop of vanilla ice-cream or frozen yogurt, a drizzle of carmel and a paleo cookie.  YUM.   

I really enjoyed these cookies because they are moist and really taste like coconut (which I love).  And by the way, Happy National Chocolate Chip Cookie Day!

Monday, May 11, 2015

Skinny Cheesecake


 I used to not like cheesecake.  I know, heinous!

Then I discovered a fantastic, magical land called "The Cheesecake Factory." I fell hard for cheesecake.

However, there is a bit of a love/hate relationship.  I LOVE cheesecake but I HATE the calorie count.  Did you know a slice of cheesecake at The Cheesecake Factory is about 900 calories? DELICIOUS, but oh so bad for you.

I found the following recipe on Pinterest and I am SO happy I tried it.  I am not kidding folks, it really tastes like cheesecake.  You know when people try to tell you something lower in calories is really good? Yet it always tastes like cardboard? This is not that case.  This is actually REALLY good.


Skinny Cheesecake

Makes 1 serving

1/2 c. Vanilla Yogurt (recipe calls for Greek but I like the texture and taste of regular vanilla)
3-4 t. Cheesecake Instant Pudding Mix (recipe calls for sugar free and fat free but I used regular)

Mix the yogurt and cheesecake dry mix.  Refrigerate.  I tasted this right after I made it and then saved some for the next day so that it had a chance to refrigerate overnight.  It tastes WAY better if it has a chance to refrigerate overnight.  The yogurt has the opportunity to fully take on the cheesecake taste and I am telling you,  it tastes like CHEESECAKE. 

I made 3 servings in one evening and I made a simple oven free graham cracker crust.  I simply took a couple T.of  butter, 3 graham crackers that had been ground into crumbs and mixed together.  I layered this amongst 3 glasses.  I then put the cheesecake mixture on top.  Then I finished it off with just a little cherry pie filling. 

I personally would not skip the crust or the pie filling.  For not many more calories you are adding a truck load of flavor and you will be much, much more satisfied.  I have only tried cherry pie filling but I am sure you could use any pie filling! Peach, blueberry, raspberry, etc!

I really hope you try it.  It is easy, cheap and really tastes like a treat. 


Tuesday, May 5, 2015

The Best Chapstick You'll Ever Buy

Wal-Mart and I have a love/hate relationship.  There are days I'm amazed at it's selection and prices and days where I think "why did I go shopping here?"

I was checking out last week and perusing the little items that were on display.  Some razors, beef jerky and WHAT??? Mango Sunrise Chapstick??

I love anything Mango so I immediately grabbed it and put it with my purchases. 

Here is the best part though.  It was a $1!

I cracked it open tonight in the car and it is AMAZING.  Really creamy, smooth and smells super mango-y.  It's like a tropical island in a tube.

With all this being said I HIGHLY recommend you go get this chapstick.  It is just the "Chapstick" brand.  I believe this is a seasonal item so I am definitely picking up a few when I am at Wal-Mart next.  These would also be great as a gift.  I'm sure on Pinterest you could find cute little printable quotes to go along with chapstick.  If you hate to use your precious ink in your printer (like Ken and I) then you can download the file to a jump drive and take it into a place like Office Max and get it printed for mere pennies. 

Have a good day!

How to Save ANY Cast Iron Pan

I destroyed a cast iron pan.  Cue the melancholy violins here.  I don't know what happened! But whatever I did I made it rust, a LOT. 

However, there is hope for these pans! My Mother and Father-in-Law showed me how to restore it.

All you do is wash out your pan with a steel wool sponge and warm water.  Dry with paper towel.  Take another paper towel and put some vegetable oil on it.  Rub this over the pan.  Preheat oven to about 200 degrees (I am actually going to try 230 degrees next time, I think it needed a bit more heat) and bake for 40-60 minutes.  The rust should be gone and the pan should be seasoned.  However, if the pan is REALLY rusted you may have to follow this process a few times. 

The wonderful thing about this is that if you are at a garage sale or a thrift shop and see a beat up cast iron pan with rust, you can save it! Some people may donate something like that (like I almost did) and give up on it when in reality it's a super simple thing to get it back to new.

I hope this helps you guys! This would be really handy to know for presents for Christmas, a bridal shower, kids going to college, etc. 


Hello and welcome!

Hello family!

Welcome to our Peaceful and Creative Living blog!

This forum is intended for us to share healthy recipes, motivational thoughts and stories, spiritual help, educational insight, workout tips etc.  The goal is to create a balanced and healthy life in mind, body and spirit. I really believe talking about other topics rather than just solely focusing on exercise and nutrition will help not only our physical but just all around well being.

Happy blogging!

- Kellee -